Shower Valve Height: What You Need to Know
When it comes to installing a shower valve, one of the most important factors to consider is the height at which it should be installed. This is because the height of the valve will impact the overall functionality and comfort of the shower. Installing the valve at the wrong height can lead to discomfort, inconvenience, and even safety hazards.
The correct height to install a shower valve can vary depending on a number of factors, including the type of shower you have and local building codes. For example, if you have a shower set in a bathtub, the valve height will typically be lower than if you have a standalone shower stall. Additionally, different areas may have different building codes that dictate the minimum and maximum heights at which shower valves can be installed.
To ensure that your shower valve is installed at the correct height, it is important to do your research and consult with a professional if necessary. By taking the time to properly install your shower valve, you can ensure that your shower is comfortable, safe, and functional for years to come.
Understanding Shower Valve Height
When it comes to installing a shower, one of the most important factors to consider is the height of the shower valve. In this section, I will explain why shower valve height is crucial and provide information on the standard height for shower valves.
Importance of Correct Shower Valve Height
The correct shower valve height is important for a few reasons. First, it affects the ease of use and accessibility of the shower. If the valve is too high or too low, it can be difficult to reach and adjust the water flow and temperature. This can be especially problematic for individuals with mobility issues or disabilities.
Second, the correct shower valve height can impact the overall aesthetic of the shower. If the valve is installed too high or too low, it can throw off the balance of the shower design and look awkward or out of place.
Finally, the correct shower valve height can impact the functionality of the shower. If the valve is installed too high, it can cause the water pressure to be too low, while if it is installed too low, it can cause the water pressure to be too high.
Standard Shower Valve Height
The standard height for shower valves is typically between 38 to 48 inches above the floor. However, the specific height may vary depending on the type of shower and personal preferences.
For showers set in bathtubs, the valve height is often lower, around 28 inches from the floor, as it needs to be accessible from both inside and outside the tub.
For standing showers, the valve height is typically higher, around 48 to 50 inches above the floor, to accommodate the taller height of the shower.
It is important to note that these are just general guidelines, and the specific height for your shower valve may vary based on factors such as the height of the user and the design of the shower.
In conclusion, understanding shower valve height is crucial when it comes to installing a shower that is both functional and aesthetically pleasing. By following the standard guidelines and taking personal preferences into account, you can ensure that your shower valve is installed at the correct height for your needs.
Installation Guide
Tools Needed
Before starting the installation process, make sure you have all the necessary tools. Here’s a list of the tools you’ll need:
- Drill
- Measuring tape
- Screwdriver
- Pliers
- Adjustable wrench
- Silicone caulk
- Shower valve kit
Step-by-Step Process
Follow these simple steps to install your shower valve:
- Turn off the water supply to your bathroom. You can do this by turning off the main water supply or the valve that controls the water supply to your bathroom.
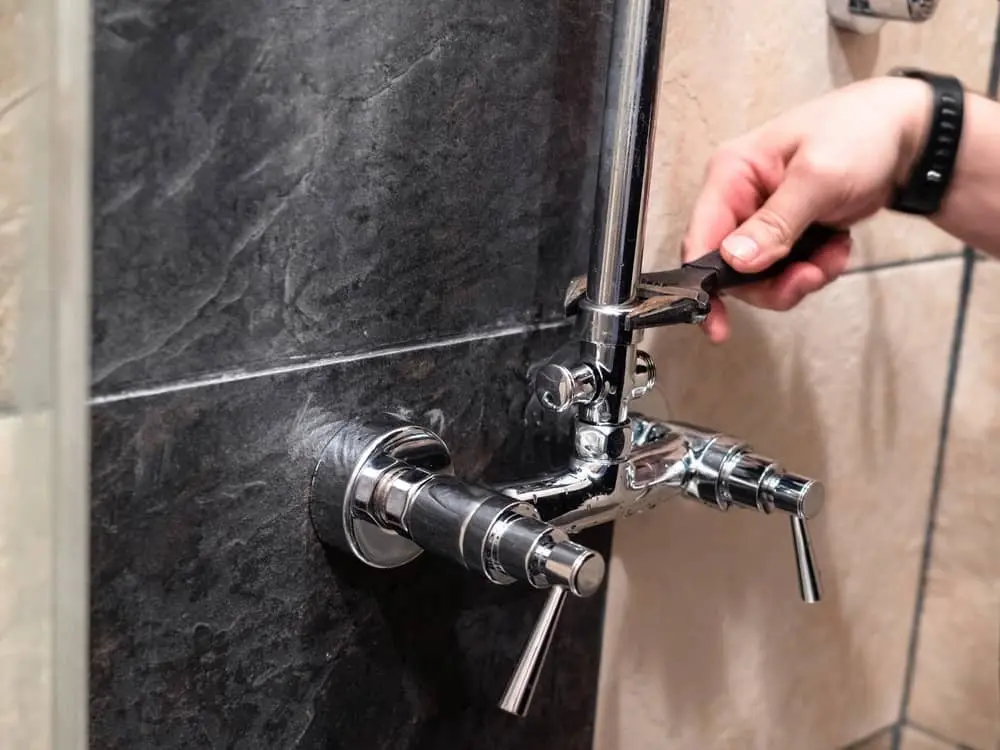
- Remove the old valve. Use a screwdriver to remove the screws that hold the old valve in place. Once the screws are removed, pull the valve out of the wall.
- Measure and mark the valve height. Measure the height of the valve and mark it on the wall. Refer to the local building codes to determine the correct height for your shower valve. Usually, the standard shower valve height is between 38 to 48 inches above the floor.
- Drill the holes. Use a drill to make the necessary holes in the wall for the valve and the showerhead.
- Install the valve. Follow the manufacturer’s instructions to install the new valve. Use pliers and an adjustable wrench to tighten the connections.
- Install the showerhead. Screw the showerhead onto the shower arm and tighten it with pliers.
- Apply silicone caulk. Apply silicone caulk around the edges of the valve and the showerhead to prevent water leakage.
- Turn on the water supply and test the shower. Turn on the water supply and test the shower for any leaks or issues.
That’s it! You’ve successfully installed your shower valve. If you’re unsure about any of the steps, refer to the manufacturer’s instructions or seek professional help.
Challenges in Setting Shower Valve Height
Setting the shower valve height can be a tricky task, as there are several factors to consider. In this section, I will discuss two main challenges that arise when setting shower valve height: dealing with varied wall types and addressing different user heights.
Dealing with Varied Wall Types
One of the challenges of setting shower valve height is dealing with varied wall types. Depending on the type of wall, the installation process and the height of the valve may differ. For example, if you have a solid concrete wall, it may be more difficult to install the valve at a lower height. On the other hand, if you have a drywall or plaster wall, it may be easier to install the valve at a lower height.
To address this challenge, it is important to consult with a professional plumber or contractor who can assess the wall type and recommend the best installation method. They can also advise on any additional reinforcement needed to ensure the valve is securely installed.
Addressing Different User Heights
Another challenge in setting shower valve height is addressing different user heights. It is important to ensure that the valve is accessible and comfortable for all users, regardless of their height. For example, if the valve is installed too high, shorter users may have difficulty reaching it, while taller users may need to bend down to adjust it.
To address this challenge, it is recommended to install the valve at a standard height of 48 inches (4 feet) from the floor. This height is comfortable for most users, whether standing or seated in a chair. However, if you have users with specific height requirements, it may be necessary to adjust the valve height accordingly.
In conclusion, setting shower valve height can be a challenging task, but by considering factors such as wall type and user height, it is possible to install a valve that is safe and comfortable for all users.
Troubleshooting Common Issues
As with any plumbing fixture, shower valves can experience issues over time. Here are some common issues you may encounter with your shower valve and how to troubleshoot them.
Leakage Problems
If you notice water dripping from your showerhead even when the valve is turned off, or if you hear a constant dripping sound, you may have a leakage problem. This issue can be caused by a faulty valve or worn-out seals.
To fix this issue, you can try tightening the valve handle or replacing the seals. If the problem persists, you may need to replace the entire valve.
Height Adjustment Issues
If you installed your shower valve at the wrong height, it can cause discomfort and inconvenience. For example, if the valve is too low, you may have to bend down to turn the water on and off. On the other hand, if the valve is too high, you may have trouble reaching it.
To adjust the height of your shower valve, you will need to remove the trim plate and adjust the valve body accordingly. If you are unsure about how to do this, it’s best to consult a professional plumber.
It’s important to note that some shower valve models have fixed heights and cannot be adjusted. In this case, you may need to consider replacing the valve with a model that offers adjustable height options.
By troubleshooting these common issues, you can ensure that your shower valve is functioning properly and providing you with a comfortable and convenient showering experience.
Conclusion
In conclusion, determining the right shower valve height is crucial to ensure a comfortable and safe showering experience. Based on my research, the standard height for shower valves falls between 36 to 48 inches from the floor. However, it’s important to note that this range may not be suitable for everyone.
Factors such as the user’s height, showerhead placement, and any physical limitations should be taken into account when deciding on the optimal shower valve height. It’s always a good idea to consult with a professional plumber or contractor to ensure that the shower valve is installed correctly.
Another important consideration is the shower valve rough-in depth. As I found in my research, the shower valve rough-in depth should be 1-7/16 inches from the finished wall when it does not include tiles. But when one attaches tiles on the wall, the shower valve rough-in should be 2-1/16 inches depth on the wall.
When installing or remodeling a shower, it’s also important to adhere to local building codes and regulations. These codes may specify minimum and maximum heights for shower valves, as well as other requirements such as anti-scald protection.
Overall, taking the time to carefully consider shower valve height and rough-in depth can make a big difference in the overall showering experience. By working with a professional and following local codes, homeowners can ensure a safe and comfortable showering experience for themselves and their families.